DIY: Paneled Surfaces For Photography
Today I thought I'd show you a DIY that will take you about a day but will be worth the time and effort if you're a photographer and/or stylist who wants to shoot more interesting photos from your studios. This DIY isn't that detailed (sorry) but what I show and tell will hopefully give you enough help to go out and do it yourself. You guys are pretty clever so I'm going to assume that you won't really need details for this project anyway. 
(This is not a white floor or table - it's simply a white paneled surface I created that is 97 cm x 97 cm - Fooled ya!)
Okay, so you know how you drool over all of the pretty food photos and other pictures online? Have you ever looked at the details? Particularly the surfaces and backgrounds in the photo? Do you really think people have cement tables, white wooden tables, wooden floors painted glossy white, black walls, gray walls, paneled walls, etc? In some cases, maybe they are shooting with what they have in their home or at a location, but after awhile, any photographer or stylist gets bored with using the same props and wants to add new texture and life to their work. They usually do this through prop rentals and swapping things out - BUT ALSO through creating their own custom backgrounds and surfaces to trick the viewer into thinking they are looking at a table or floor or wall surface that really doesn't exist. Smoke and mirrors, people. Smoke and mirrors. And I love it.
So I decided to create some of my own smoke and mirrors using wood from the home store. I wanted to create cool backgrounds and surfaces for my photography and styling work out of wood that I could store behind my big cabinet in my studio and pull out on the fly to shoot things on or in front of. I recently wrapped up a major ad campaign for Canon Europe and these would have come in handy for the styling work I did at home. But hey, better late than never.
I love the look of wood so I thought that it was time to hit the local Home Depot, which over here the German equivalent is Toom, only they have a bakery and serve Bratwurst - ha ha! But yeah, so I hit Toom with my husband and looked through the lumber dept. when he told me how he had all of this experience in the past with paneling walls and ceilings and I was like, "Wha???", because we've be together for eons and I never knew he could panel rooms. Holding back until the perfect time, I guess... So I asked him to tell me more. Then he walk over to these like 2 meter high pieces of wood with slots in packages and said, "We can buy a pack of these, have that guy over there cut them for us in any size we want, and then we'll go home and fit them together, paint, etc." Then he suggested the right dimensions to the wood guy, he fired up his mega cutting machine, cut them, and in the end we ended up with two gorgeous surfaces that I can use at home for my projects. ALL FOR $10!
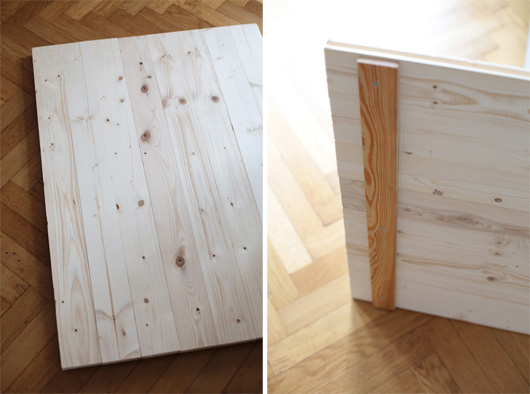
I was all shades of happy. Wood with slots for sliding together to create paneling (not MDF but using 100% wood)? Really? I don't need to use a thousand nails? This is fantastic! Above you can see what the surface looked like after we fit them together (which was easy and took maybe 5 minutes), and then you can see how we used a piece of wood (x 2) across the back to keep them in place so they don't slide around. Make sure your pieces of wood are the exact width of your surface so it's supportive and also doesn't wobble in use. That's annoying. I still have to decide what I'll do to the wood surface above, but to the second surface we put together, I painted it white with two coats of wooden exterior home paint that I had left over from another project - you can see it below. I always try to use up all of my leftover paint before I buy new pints and gallons.
See the shot taken above on the right side? Okay so that is what a shot looks like BEFORE smoke and mirrors is applied. A stylist would put the surface in place and then the photographer would ensure to not show that the surface is really only part of the prop. So they'd crop the image or simply zoom in as I've done below.
This is how it looks AFTER smoke and mirrors, in other words how it would look best to fool the eye and also give you the chance to change up how the walls look where you're shooting. Brilliant, right?
I hope that you've enjoyed this little stylists' DIY. If you have any questions that don't involve power tools, please ask me in the comments section below. And now when you see any white paneling in my photos I'm busted, right!?
Lots of love and happy decorating!
(images: holly becker for decor8 - All props are my own: pillow from Caravan, vases from House Doctor and Rice, gray cabinet from HKLiving and the La Volière table lamp)


